We are a class from British Columbia, Canada. We are a class of 19 very curious and excited students that enjoy a wide range of activities (although gym always seems to come out on top!). We are interested in technology and how we can use it in the classroom to connect with our families and other people around the world.
14 Days of Adventure – Day 5: Win a Medal At the Olympics
Got your attention didn’t I? Well, you won’t actually win a medal but here is a fun game to play to imagine that you are in the Olympics . . . if they had snowmen in the Olympics . . . . if the snowmen had skis . . . if there actually was enough snow to make a snowman. Anyway, it’s . . .
Day 5: Win a Medal At the Olympics
Play the game below. Simply ski the snowman down the hill using your arrow keys and collect the parts of the snowman. Don’t hit the trees though. If you ski from side to side that will slow you down.
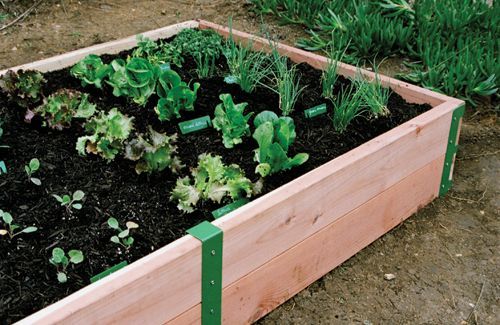
14 Days of Adventure – Day 4: Create a Nature Scrapbook!
I hope you have been enjoying the 14 Days of Adventure Series! Let me know in the comments if you have liked any of these ideas and have done any. Or bring your creations to class when the break is over. Here is today’s adventure:
Day 4: Create a Nature Scrapbook!
One of the things I remember doing as a child for one of my Scouts badges was creating a nature scrapbook recording a day through our local forest. It was a collaboration of journal entries, illustrations, observations, narrations, photographs, and discoveries. I spent a wonderful day with my father walking through our forest collecting samples of leaves, seeds, bark, and other items of interest. We also spent some time drawing some of the things we found in the little stream (as we couldn’t take those with us!) as well as took photos of anything we liked including birds.
At home, we compiled all the things we found into an album adding field notes, descriptions and the photos we had taken. We used nature books to find out the names of the flowers and trees we had seen and animal books to write down the names of the birds we had seen. We used labels to add these names and descriptions to our book just like we have done in Science.
It was a wonderful time with my father and we learned a lot about the things that grew around us just like in Danny the Champion of the World.
Here is some more information about creating a Nature Scrapbook:
How to Make a Nature Album
A Creative Scrapbooking Project for Springtime
A great way to welcome the onset of spring is to create a scrapbook album focused on the themes of nature, birth and growth.
As snow begins to melt, the onset of spring brings with it many opportunities to celebrate the beauty of the great outdoors. Compiling a scrapbook album that captures glimpses of spring is a wonderful way to preserve the memories that accompany the season. The following suggestions will help inspire scrapbook enthusiasts to create a simple album.
Basic Scrapbooking Tools
The first thing that is needed for a nature album is the actual album. Scrapbooks come in a variety of sizes and are available in many department stores and craft stores. It is important to remember that if photographs or other sensitive memorabilia are going to be used, the album and it’s pages need to be acid-free.
Once the album is chosen there are a few other basic tools that will be needed for the project. These items include;
A 12″ x 12″ paper trimmer.
Scissors or other manual paper cutters.
Acid-free adhesives (tapes and glues).
At least one acid-free pen for journaling.
Page protectors (if they aren’t already included with the album).
Although they are not required to complete a basic nature album, using a variety of scrapbooking embellishments on layouts (such as brads, stickers, letters, ribbons and eyelets) can help to enhance album pages. Such items can be found in scrapbooking specialty shops in large quantities and in many different themes and colours.
Create Magazine Collages
Look through nature and wildlife magazines for pictures that center on outdoor themes. Choose pictures, titles, and words that stand out from the rest. Cut and paste the clippings onto an album page to create a collage that represents a spring related theme. Some themes that work well for a magazine collage can include;
Outdoor adventures.
Peace and solitude.
Spring activities or events.
Spring vacation spots.
Preserve Keepsakes from NatureTake a walk and collect leaves, crocuses and other wildflowers. These can be pressed and then preserved in scrapbook layouts in a variety of different ways.
Create Traditional Scrapbook Layouts
Take pictures of the surrounding beauty and growth that takes place as the snow melts. Zoom lenses can be used better capture the details of flower buds, greenery and new wildlife. These pictures can be put together to create a nature specific layout of their own, or they can be used with photos of family activities or community events that take place this time of year.
Always Include Journaling
Whether it be short descriptions of basic facts about an event, or lengthy creative entries related to the season, journaling is essential to the overall effect of a layout.
Bulleted lists can be used to outline the main points.
Write one or two sentences beneath a picture to add some details to the theme.
A brief but descriptive paragraph can enhance the imagery of the layout.
Detailed storytelling can be used to share behind the scenes information.
A nature album need not be complicated or take a lot of time to complete. The main purpose to constructing a nature album is to capture the essence of the outdoors and the beauty of new life. How much or how little one prefers to include in her layouts is strictly a matter of taste.
So, get out there and get started on your nature scrapbook today! Enjoy the beautiful weather!!!
14 Days of Adventure – Day 3: Grow the Biggest Zucchini In Your Neighborhood.
Day 3: Grow the Biggest Zucchini In Your Neighborhood
Okay! So maybe you don’t want to grow zucchini. Can’t blame you. Don’t like the stuff myself. But what better way to learn the basics of science and how things grow than to plant your own garden? You can start with seeds or small plants. Talk about what plants need to be hardy: air, water, sunlight and nutrients. Vegetables are especially fun and educational to plant because your child will learn where food comes from and will also get to eat the end product.
My wife loves planning her garden right about this time. She takes her seed catalog and some graph paper, sits down with a nice cup of tea and draws the backyard. With the graph paper, she draws the plots in her garden and plans where she will plant her food. We don’t have a huge garden but in the fall, when all the food comes in, it is so nice to be able to eat locally grown food that seems to taste so much better than when you buy it in the store. And your kids will love eating food they’ve grown themselves. It doesn’t even take that much time weeding when you just have a few small plots. We even grew potatoes in large planters. In the fall, we up-end the dirt out of the planters and shake the dirt off the spuds!
So start now and get planning that garden. Even a field trip to the local store for seeds is a fun time!
14 Days of Adventure – Day 2: Become the Family’s Junior Travel Agent
With the Olympics underway, what better time to think about a trip in to see the sights of Vancouver than now. How much do you know about Vancouver? Have your child plan your trip into Vancouver and choose places they would like to see.
Half the fun of a trip starts before you get there. Involve your child in the planning by practicing how to use a map to find tourist attractions, and how to estimate distances. If you are driving, work with your child to figure out how much gas it will take to get there and estimate the cost. If you are traveling by train, check travel schedules and costs.
Research Vancouver in books and on the Internet. You can take a trip to the bookstore and let your child find the books on Vancouver to start planning some places to go or research on the Internet. They can practice their writing skills by writing to the Vancouver tourism bureau to ask for information.
Get some maps of the city and find websites with information on tourist attractions in Vancouver. Find out where those attractions are and find them on the map.
One fun thing you can do is to get tourist information about Vancouver, cut out the information on the places you want to go and glue them onto the map of Vancouver with arrows pointing to the location. Then you have a nice visual representation of where you want to go.
You can also use Google Maps to plan your trip. With Google Maps you can add pins and information about where you want to go and things you want to see.
Here are some directions for using Google Maps:
Your maps can contain the following:
Placemarks
Lines
Shapes
Once you have created a map, you can:
Add descriptive text, including rich text and HTML
To create or edit maps, you must be signed in to your Google Account. You can use the mrhclass@gmail account with the password (remember: the one about my evil twin brother).
Creating a Map
Creating a map is easy. Here are the basic steps:
Click My Maps
Click Create new map.
Add a title and description for your map.
Decide whether the map should be public or unlisted. Public maps are automatically included in Google Maps search.
Use the icons in the top left corner of the map. These include:
Selection tool. Use this to drag the map and select placemarks, lines and shapes. Placemark tool. Use this to add placemarks. Line tool. Use this to draw lines. Shape tool. Use this to draw shapes.
You can return to your map at any time. Just go to Google Maps and click My Maps. Sign in to your Google Account and select the map from your list of maps.
Saving Driving Directions New!
With My Maps, you can save, annotate and share driving directions with others. To save directions:
Get the driving directions you need using Google Maps (click here to learn how).
Click Save to My Maps underneath the directions.
You now have the option to save your directions to an existing map that you’ve created with My Maps, or to create a new map. Choose one of these options using the drop-down menu and click Save.
You’ll now see the directions in the My Maps editor where you can edit the start and destination placemarks, as well as your route by clicking on each feature in the left panel.
Deleting Your Maps
To delete a map that you have created:
Click My Maps. A list of your maps appears in the Created by me section.
Click the X beside the map that you wish to delete.
Sharing Your Maps
Once you have created a map, you can share it with others. To do this:
Click the title of the map that you want to share.
Click Link to this page above the map.
You can share this URL with your friends by sending it in an email or posting it on your blog or website.
Send me the link to your map and I will put it on the blog!
The great thing about this activity is that you can do this for any location in the world! Not just Vancouver! Get your Mom and Dad to sit down with you and show you some of the great places you can go around the world. Pick one of them and get your parents to help you find some information about that location. Buy or print out a map of that place and find some information about it by searching online for tourist information about that place. You can email them or write them a letter asking for information and they will send it to you free! You can have all sorts of fun with this. Plan your ultimate trip and find learn something new about our wonderful world.
Here is another cool tool you can use once you have chosen a place to visit. Use the website Map Envelope to print out an envelope with a map of your place on it. You then fold it up and glue it together to make your envelope. Add your letter asking for information inside and wait for your information to arrive!
Here is a neat video showing some of the great places in Vancouver.
14 Days of Adventure – Day 1: Create Your Own Pirate Adventure
I hope everyone is enjoying their holidays. It has been nice to sit around the house and watch the Olympics (while trying to keep Siena out of trouble!). I am sure many of you have plans for this winter break but if you don’t you may be going a little stir crazy. Soooo, for the next 14 days, I thought I would create a series of adventures for you and your children to do together. I call it the “14 Days of Adventure”.
Each day, I will put something new on the blog that you can do with your children and family. The activities will include games, crafts, outdoor adventures, etc. that will get your child out from in front of the tv and actively using their brains. So, here we go with . . .
Day 1: Create Your Own Pirate Adventure
Pirates are always fun (except for the Pirates who don’t do anything. They’re a little lazy!). So, for today’s adventure, make your own pirate ship with a milk carton and some construction paper. Here are the instructions.
Materials:
2 milk cartons
2 straws
playdough
yellow, black and white construction paper
glue, scissors and tape
Tape a piece of construction paper about 1/2 way up the milk carton as shown in the photo to the right.
Tape black construction paper all the way up the back of the milk carton, leaving about 1 inch sticking up over the carton
Tape white construction paper over the rest of the milk carton
Glue two blobs of playdough into the center of the pirate ship
Cut a two to three inch piece off the bottom of the second milk carton.
Tape it onto the ship (covering the playdough)
Poke two holes in it (with a pencil) right above the playdough blobs
Cover with white construction paper
Stick two straws through the holes you poked in the top carton
Cut two large rectangles and two small rectangles from yellow construction paper
Poke two holes in each rectangle with scissors or a hole punch and thread onto the straws as masts
Draw windows and a door with markers
Cut yellow circles and glue them to the side of the ship as portholes
Use the Treasure Map Maker Link on the left side to make your own treasure map.
Of course, ye’ll be needing a fine pirate name fer yerself and fer yer ship, matey. Write your pirate ship name on your ship.
Make up an adventure and write it down in your “Ships Log” or write about your pirate adventures here on the blog by clicking on comments and writing your story!
Then watch this video below by a family who created their own pirate adventure using their video camera. They used stop motion to make it. You can make your own stop motion video by getting lego and other things with your pirate ship. Just take your video camera, get your scene ready, then press record for 1 or 2 secs. Stop the video camera and change something small in your scene. Then repeat.
Just a quick reminder that we are going swimming tomorrow afternoon from 1:00 to 3:00 in the afternoon (just in case you thought it was 1:00 to 3:00 in the morning :)). You will need your swimsuit and a towel to take with you. We are still dressing in our uniforms but you can wear your swimsuit underneath as long as you bring your stuff for after the swimming! It should be a lot of fun. Remember that we will be going on the fieldtrip to the Planetarium on the 25th of March after all the hoopla and excitement of the Olympics is over the traffic has settled back to normal.
If you have not brought your permission form back for the swimming yet, please make sure that you have it for tomorrow!
Today was a busy day with lots of things happening in every corner. For Language Arts, we started looking at middles of stories and how important to have a story where the middle was easy to follow, events are in order, that it makes sense, and only focuses on the important information. We read two books today as examples. The first book was called “The Doghouse”. It is a very simple story about some animals who have to retrieve their ball from the inside of a doghouse but it is very good at showing organization of events and how one event leads to the other. The other book we read was called “The Great Paper Caper” by Oliver Jeffers; on e of my favorite childrens authors.
I thought I would add a couple of fun things for you today. The first item is some games you can play at the dinner table. Simply print the circles out just like you do for your spelling test, cut the circles out and choose one of the sections to play at supper. Or you can make them into spinners and spin them to see which game you get!
Hope everyone had a great weekend! It was very nice and relaxing for us. The calm before the storm! With our baby being expected around the 23rd of March, I know that there will not be many relaxing days left! As a friend just told me the other day, when it comes to children, 1+1 does not equal two! Anyway, we are very excited for the new arrival.
Here are the words for this week followed by the Spelling City link.
Here is the link to the Spelling City page. Don’t forget! If you complete the spelling test on the Spelling City website and you bring it in to me, I will give you an extra mark on your spelling test on Friday!
Next week, students will be going on a Field trip to the Planetarium. The field trip is being planned for Feb. 9th and permission forms went home today. Permission forms need to be brought back by Friday!!! If you need another copy of the permission form, you can download one from the box.net widget on the right hand side of the website.
Another reminder about the Speech Meet! We will be holding the try-outs next Weds so please help your child have their pieces ready and memorized. Students have already been telling me that they have been practicing which is fantastic.
Thank you! Thank you! Thank You! for all the help you give your child at home!
Just a reminder that tomorrow is a casual day . . . . but you have to bring a loonie!!! We are collecting money for our missions trips over the winter break. We are making one last push to raise as much money as we can! If you do not want to wear casual clothes tomorrow, please wear your uniforms!!!!
It’s been a busy week and thus the blog posts have been few and far between. My apologies and I will try to be more regular with my posts.
First of all, there is no spelling list or memory verse for this week due to the shortened week. We will continue with the spelling and memory verse next week as per usual. After this next spelling list, we will be going back to review past spelling words and start doing more work with them in sentence form.
You may have noticed that your child brought home a poem in their planner (or pocket as the case may be). It is that time of year again and we are preparing for the Speech Meet which is held annually in Abbotsford. This is a big event for us and we always do very well. However, this year is a little different for us as we have a winter break between now and the day of the Speech Meet, which will be held on March 5. As we want to get our entries in before we leave, we will be choosing the students who will be going on February 10th. Participation is optional and if your child did not bring home a poem or memory verse that may mean they did not want to do it. Please ask your child if they selected a verse or poem to practice. Poems or memory verses must be memorized. We are also working on adding expression and proper standing postures to the recitations with students standing nice and straight with no hands in their pockets and their eyes on the audience. Adding expression is always hard for students but we are looking for students who can recite with confidence using a proper volume and with excitement in their voices. On February 10th, we will hear all the students from our class who chose to do a recitation and I will pick students from there. We are allowed to send 1 poem reader and 1 memory verse reader from the Grade 2 and 1 poem reader and 1 memory verse reader from the Grade 3’s in my class. If you have any questions or you need another copy of the poem please let me know!
Science has been a frantic, “let’s finish it up” time with students trying to get all their projects and papers done and in order before the deadline. Looking at the budgets from each class, all students were able to complete their projects on time and within budget. Luckily the storekeeper was very kind and gave some great deals towards the end of the projects. Projects will be going home tomorrow, but you can see them right now by watching the video below!
Our next science unit will be on States of Matter where students will be taking a close look at the properties of air, water, and gas.
In Language Arts, we have been continuing with our Daily 3 reading program. It has really been great to be able to work with small groups of students at the same time. As I work with the students in these small groups listening to them reading and working on certain aspects of their reading and comprehension skills, the other students are focused on sharing reading with a partner, reading on their own or reading along with a Cd. It has been a great program. For our writing, we have moved into organization of stories with a focus at this point on story beginnings. We have talked about how a story beginning needs to draw in readers and make them want to keep reading. One of the students today said that it is like writing the first part of a story and putting a “to be continued” at the end of it. It makes the reader interested in how the story is going to resolve itself. We took some common events from throughout the year, and drew a picture of ourselves doing that ordinary, everyday activity. However, the students added something interesting into the pictures to make it more exciting. Now, they are working on taking the picture and crafting it into a story beginning. At the same time, we have also talked about how we need to make our first sentence interesting as well, which is always a hard thing for students to do. We talked about how they can use beginnings like “One day . . . “, “It was a warm and bright . . . “, use conversations to start a story or use a book to find a beginning that you can adapt and use in your own story. We have already been getting some very interesting story beginnings. From there, we will work on the middles of stories and endings. I also told the students that I had a crazy idea for putting all those story beginning, middles and endings together into one story but I would tell them later. I will give you a clue though:
Speaking of Oliver Jeffers, if you haven’t read any of his children’s books, I highly recommend them. They are lots of fun and the illustrations are beautiful! They have also made one of his books into an animated video, which you can see a preview of right here:
I have placed some new links on the side. You should see a link to the Reading A-Z site where students can read books online and have them read to them as well! I have also put a link to a neat site where students can make regular maps and treasure maps to play with and print out. The last link is to a neat free program where students can make cool mindmaps of anything they want. It is free but annoying pop ups to buy to program come up every once and awhile.


 top carton
 from yellow construction paper


