Day 3: Grow the Biggest Zucchini In Your Neighborhood
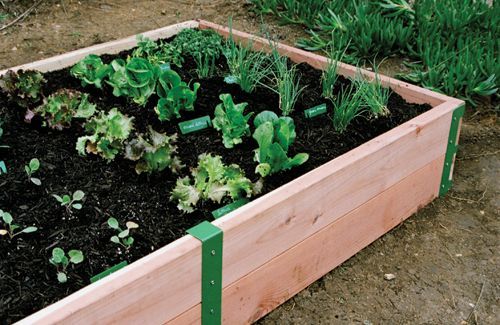
Okay! So maybe you don’t want to grow zucchini. Can’t blame you. Don’t like the stuff myself. But what better way to learn the basics of science and how things grow than to plant your own garden? You can start with seeds or small plants. Talk about what plants need to be hardy: air, water, sunlight and nutrients. Vegetables are especially fun and educational to plant because your child will learn where food comes from and will also get to eat the end product.
My wife loves planning her garden right about this time. She takes her seed catalog and some graph paper, sits down with a nice cup of tea and draws the backyard. With the graph paper, she draws the plots in her garden and plans where she will plant her food. We don’t have a huge garden but in the fall, when all the food comes in, it is so nice to be able to eat locally grown food that seems to taste so much better than when you buy it in the store. And your kids will love eating food they’ve grown themselves. It doesn’t even take that much time weeding when you just have a few small plots. We even grew potatoes in large planters. In the fall, we up-end the dirt out of the planters and shake the dirt off the spuds!
So start now and get planning that garden. Even a field trip to the local store for seeds is a fun time!
14 Days of Adventure – Day 2: Become the Family’s Junior Travel Agent
With the Olympics underway, what better time to think about a trip in to see the sights of Vancouver than now. How much do you know about Vancouver? Have your child plan your trip into Vancouver and choose places they would like to see.
Half the fun of a trip starts before you get there. Involve your child in the planning by practicing how to use a map to find tourist attractions, and how to estimate distances. If you are driving, work with your child to figure out how much gas it will take to get there and estimate the cost. If you are traveling by train, check travel schedules and costs.
Research Vancouver in books and on the Internet. You can take a trip to the bookstore and let your child find the books on Vancouver to start planning some places to go or research on the Internet. They can practice their writing skills by writing to the Vancouver tourism bureau to ask for information.
Get some maps of the city and find websites with information on tourist attractions in Vancouver. Find out where those attractions are and find them on the map.
One fun thing you can do is to get tourist information about Vancouver, cut out the information on the places you want to go and glue them onto the map of Vancouver with arrows pointing to the location. Then you have a nice visual representation of where you want to go.
You can also use Google Maps to plan your trip. With Google Maps you can add pins and information about where you want to go and things you want to see.
Here are some directions for using Google Maps:
Your maps can contain the following:
Placemarks
Lines
Shapes
Once you have created a map, you can:
Add descriptive text, including rich text and HTML
To create or edit maps, you must be signed in to your Google Account. You can use the mrhclass@gmail account with the password (remember: the one about my evil twin brother).
Creating a Map
Creating a map is easy. Here are the basic steps:
Click My Maps
Click Create new map.
Add a title and description for your map.
Decide whether the map should be public or unlisted. Public maps are automatically included in Google Maps search.
Use the icons in the top left corner of the map. These include:
Selection tool. Use this to drag the map and select placemarks, lines and shapes. Placemark tool. Use this to add placemarks. Line tool. Use this to draw lines. Shape tool. Use this to draw shapes.
You can return to your map at any time. Just go to Google Maps and click My Maps. Sign in to your Google Account and select the map from your list of maps.
Saving Driving Directions New!
With My Maps, you can save, annotate and share driving directions with others. To save directions:
Get the driving directions you need using Google Maps (click here to learn how).
Click Save to My Maps underneath the directions.
You now have the option to save your directions to an existing map that you’ve created with My Maps, or to create a new map. Choose one of these options using the drop-down menu and click Save.
You’ll now see the directions in the My Maps editor where you can edit the start and destination placemarks, as well as your route by clicking on each feature in the left panel.
Deleting Your Maps
To delete a map that you have created:
Click My Maps. A list of your maps appears in the Created by me section.
Click the X beside the map that you wish to delete.
Sharing Your Maps
Once you have created a map, you can share it with others. To do this:
Click the title of the map that you want to share.
Click Link to this page above the map.
You can share this URL with your friends by sending it in an email or posting it on your blog or website.
Send me the link to your map and I will put it on the blog!
The great thing about this activity is that you can do this for any location in the world! Not just Vancouver! Get your Mom and Dad to sit down with you and show you some of the great places you can go around the world. Pick one of them and get your parents to help you find some information about that location. Buy or print out a map of that place and find some information about it by searching online for tourist information about that place. You can email them or write them a letter asking for information and they will send it to you free! You can have all sorts of fun with this. Plan your ultimate trip and find learn something new about our wonderful world.
Here is another cool tool you can use once you have chosen a place to visit. Use the website Map Envelope to print out an envelope with a map of your place on it. You then fold it up and glue it together to make your envelope. Add your letter asking for information inside and wait for your information to arrive!
Here is a neat video showing some of the great places in Vancouver.
14 Days of Adventure – Day 1: Create Your Own Pirate Adventure
I hope everyone is enjoying their holidays. It has been nice to sit around the house and watch the Olympics (while trying to keep Siena out of trouble!). I am sure many of you have plans for this winter break but if you don’t you may be going a little stir crazy. Soooo, for the next 14 days, I thought I would create a series of adventures for you and your children to do together. I call it the “14 Days of Adventure”.
Each day, I will put something new on the blog that you can do with your children and family. The activities will include games, crafts, outdoor adventures, etc. that will get your child out from in front of the tv and actively using their brains. So, here we go with . . .
Day 1: Create Your Own Pirate Adventure
Pirates are always fun (except for the Pirates who don’t do anything. They’re a little lazy!). So, for today’s adventure, make your own pirate ship with a milk carton and some construction paper. Here are the instructions.
Materials:
2 milk cartons
2 straws
playdough
yellow, black and white construction paper
glue, scissors and tape
Tape a piece of construction paper about 1/2 way up the milk carton as shown in the photo to the right.
Tape black construction paper all the way up the back of the milk carton, leaving about 1 inch sticking up over the carton
Tape white construction paper over the rest of the milk carton
Glue two blobs of playdough into the center of the pirate ship
Cut a two to three inch piece off the bottom of the second milk carton.
Tape it onto the ship (covering the playdough)
Poke two holes in it (with a pencil) right above the playdough blobs
Cover with white construction paper
Stick two straws through the holes you poked in the top carton
Cut two large rectangles and two small rectangles from yellow construction paper
Poke two holes in each rectangle with scissors or a hole punch and thread onto the straws as masts
Draw windows and a door with markers
Cut yellow circles and glue them to the side of the ship as portholes
Use the Treasure Map Maker Link on the left side to make your own treasure map.
Of course, ye’ll be needing a fine pirate name fer yerself and fer yer ship, matey. Write your pirate ship name on your ship.
Make up an adventure and write it down in your “Ships Log” or write about your pirate adventures here on the blog by clicking on comments and writing your story!
Then watch this video below by a family who created their own pirate adventure using their video camera. They used stop motion to make it. You can make your own stop motion video by getting lego and other things with your pirate ship. Just take your video camera, get your scene ready, then press record for 1 or 2 secs. Stop the video camera and change something small in your scene. Then repeat.


 top carton
 from yellow construction paper